Create Recovery Clonezilla
Create an autorun recovery Clonezilla live CD or USB flash drive (Step by step)
Boot the machine via Clonezilla live
In this example, the machine has 2 disks, 1st disk's name is sda (device name in GNU/Linux), 2nd disk's device name is sdb. We already have a Clonezilla image in sdb.
Note
You must first create an image and it should exist in dir /home/partimag, otherwise later the menu "recovery-iso-zip" won't be shown.
In this example, the image name is called bookworm-2023-10-15-03-img:
root@debian:/home/partimag# ls -l
total 20
drwxr-xr-x 2 root root  4096 Oct 15 03:33 bookworm-2023-10-15-03-img
drwx------ 2 root root 16384 Oct 15 02:47 lost+found

root@debian:~# ls -lh /home/partimag/bookworm-2023-10-15-03-img/
total 1.3G
-rw-r--r-- 1 root root  901 Oct 15 03:33 blkdev.list
-rw-r--r-- 1 root root  770 Oct 15 03:33 blkid.list
-rw-r--r-- 1 root root 8.0K Oct 15 03:33 clonezilla-img
-rw-r--r-- 1 root root  218 Oct 15 03:33 dev-fs.list
-rw-r--r-- 1 root root    4 Oct 15 03:33 disk
-rw-r--r-- 1 root root 1.2K Oct 15 03:33 efi-nvram.dat
-rw-r--r-- 1 root root 118K Oct 15 03:33 Info-dmi.txt
-rw-r--r-- 1 root root  236 Oct 15 03:33 Info-img-id.txt
-rw-r--r-- 1 root root   67 Oct 15 03:33 Info-img-size.txt
-rw-r--r-- 1 root root  73K Oct 15 03:33 Info-lshw.txt
-rw-r--r-- 1 root root 4.6K Oct 15 03:33 Info-lspci.txt
-rw-r--r-- 1 root root  824 Oct 15 03:33 Info-OS-prober.txt
-rw-r--r-- 1 root root  198 Oct 15 03:33 Info-packages.txt
-rw-r--r-- 1 root root  101 Oct 15 03:33 Info-saved-by-cmd.txt
-rw-r--r-- 1 root root  980 Oct 15 03:33 Info-smart.txt
-rw-r--r-- 1 root root   15 Oct 15 03:33 parts
-rw------- 1 root root 2.5M Oct 15 03:32 sda1.vfat-ptcl-img.zst
-rw------- 1 root root 1.3G Oct 15 03:33 sda2.ext4-ptcl-img.zst
-rw------- 1 root root 315K Oct 15 03:33 sda4.ext4-ptcl-img.zst
-rw-r--r-- 1 root root   36 Oct 15 03:33 sda-chs.sf
-rw-r--r-- 1 root root  17K Oct 15 03:33 sda-gpt-1st
-rw-r--r-- 1 root root  16K Oct 15 03:33 sda-gpt-2nd
-rw-r--r-- 1 root root  18K Oct 15 03:33 sda-gpt.gdisk
-rw-r--r-- 1 root root  724 Oct 15 03:33 sda-gpt.sgdisk
-rw-r--r-- 1 root root  512 Oct 15 03:33 sda-mbr
-rw-r--r-- 1 root root  440 Oct 15 03:33 sda-pt.parted
-rw-r--r-- 1 root root  392 Oct 15 03:33 sda-pt.parted.compact
-rw-r--r-- 1 root root  684 Oct 15 03:33 sda-pt.sf
-rw-r--r-- 1 root root   53 Oct 15 03:33 swappt-sda3.info
Now we will use the image bookworm-2023-10-15-03-img to create a recovery Clonezilla live CD, which can be used to recover the sda if the system on sda crashes.
Once you have the bootable Clonezilla Live CD/DVD or USB flash drive, you can boot the machine you want to clone via Clonezilla live. Remember to use the Clonezilla live CD or USB flash drive to boot the machine. For example, if you have Clonezilla Live in USB flash drive, you have to boot it via USB device (Ex. USB-HDD or USB-ZIP). If necessary, you can set the first boot priority in the BIOS as USB-HDD or USB-ZIP so that it can boot Clonezilla Live from your USB flash drive.
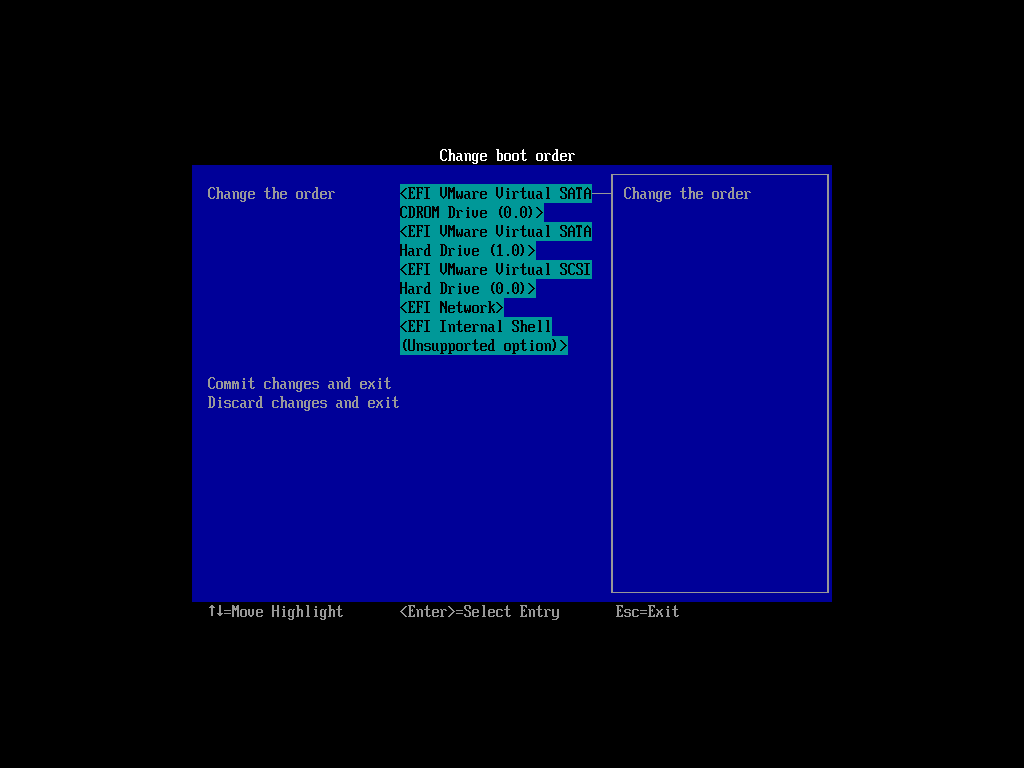
Here we take CD as an example. You can either set CD as first boot priority in machine's BIOS like this:
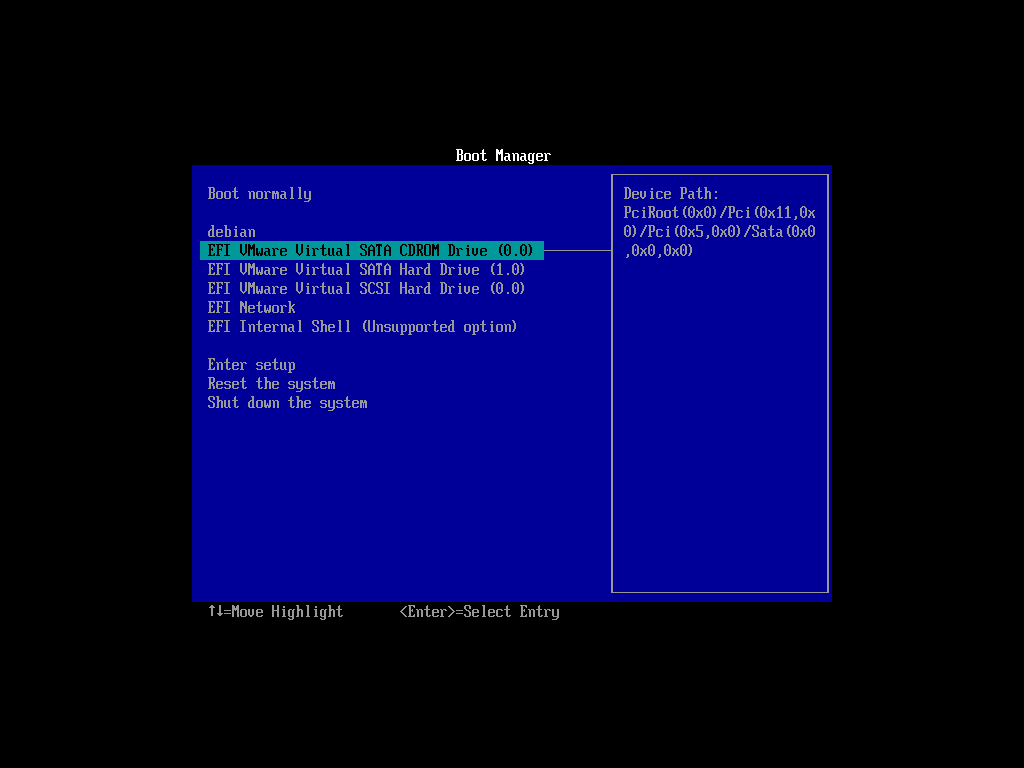
Or by pressing a hotkey (e.g. Esc or F9) when you boot the machine, you will see the boot menu of BIOS like this:
Check your motherboard manual for more details about how to boot your machine via CD.
The boot menu of Clonezilla live
Here is a screenshot of Clonezilla Live boot menu:
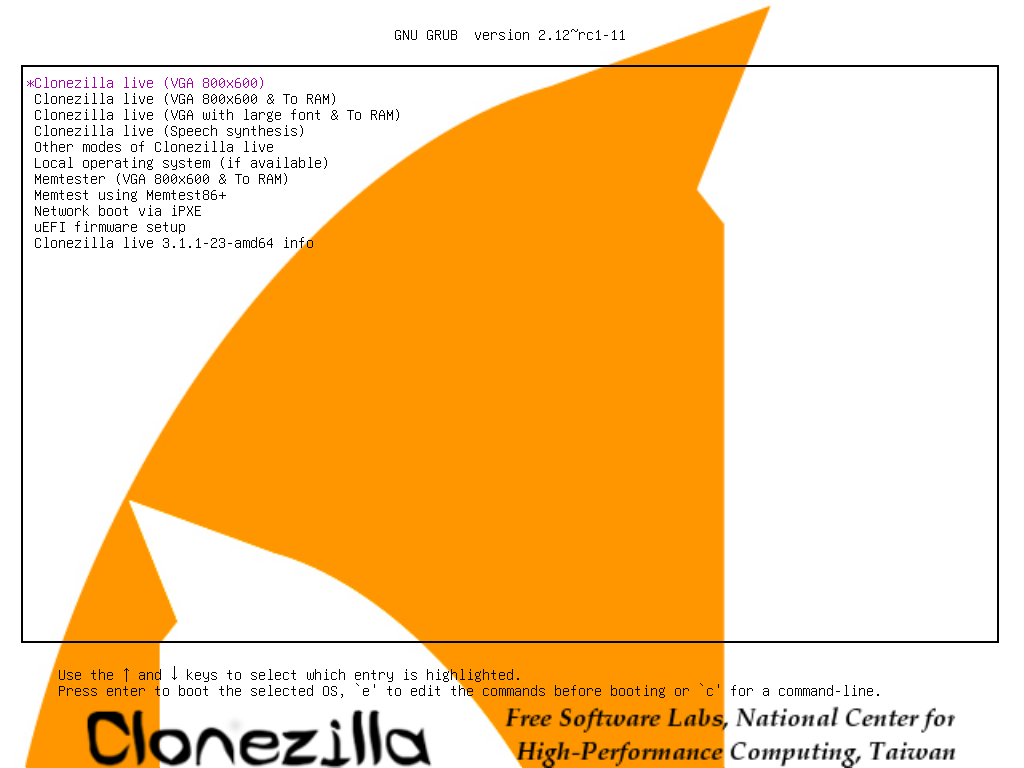
The first one is the default mode for Clonezilla Live. It will default to framebuffer mode with a resolution of 800x600.
The 2nd one (VGA 800x600 & To RAM), is the same function with the 1st one except when Clonezilla live booting finishes, all the necessary files are copied to memory. Therefore you can remove the boot media (CD or USB flash drive) then. In addition to use the arrow key to choose, you can also press r to choose that.
The 3rd one (VGA with large font & To RAM) is for you to use large font, especially when you have 4K monitor, and it will all the necessary files will be copied to memory. In addition to use the arrow key to choose, you can also press l to choose that.
The 4th one (Speech synthesis) is for the blind to use, which can be chosen by pressing s key.
There are more modes which you can choose in the 5th choice Other modes of Clonezilla live, e.g. 1024X768 or 640x480 one if you want, as shown here:
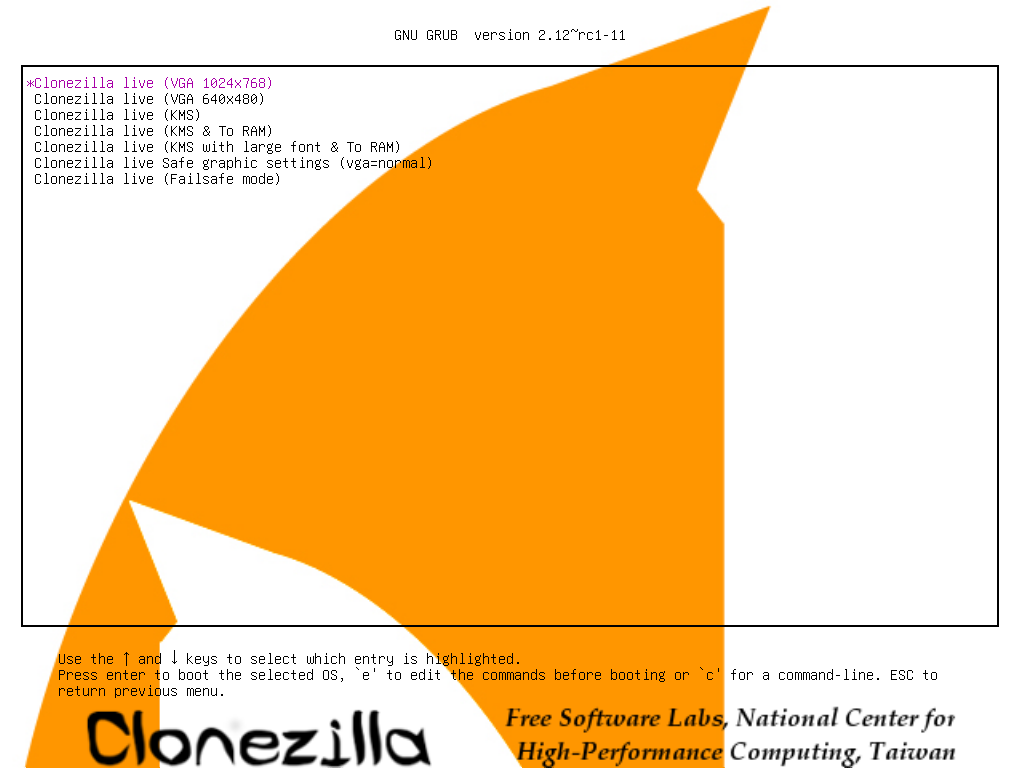
The choice, KMS is for you to use KMS (Kernel Mode Setting) for your graphics card. If you have some problem to use the framebuffer mode of your graphics card, you can try it.
If you do not need Chinese, Japanese or Korean environment or if your computer experiences problems in the framebuffer mode, you can choose the one Clonezilla Live Safe graphic settings (vga=normal) to clone in the English environment.
The choice, Clonezilla live (Failsafe mode), is for something goes wrong when you are not be able to boot your machine, such as ACPI of your machine is not supported in the kernel.
If you want to boot local OS in your hard drive, you can choose the one Local operating system in hard drive (if available). This is an extra function in the boot media that has nothing to do with Clonezilla Live.
The choice, Memtester (VGA 800x600 & To RAM) is for memory testing using Memtester. This is an extra function in the boot media that has nothing to do with Clonezilla Live.
The choice, Memory test using Memtest86+, is for memory testing using Memtest86+. This is an extra function in the boot media that has nothing to do with Clonezilla Live.
The choice, Network boot via iPXE is used to perform a network boot via iPXE. If your computer does not have a PXE network, you can use this to do boot from a network. This is an extra function in the boot media that has nothing to do with Clonezilla Live.
The choice, uEFI firmware setup is used to enter uEFI BIOS settings.
Here we choose 800x600 mode, after pressing Enter, you will see Debian Linux booting process:

Note
Do NOT choose the To RAM option of boot menu in this case. It will NOT work for creating recovery ISO or zip file.
Choose language

Choose keyboard layout
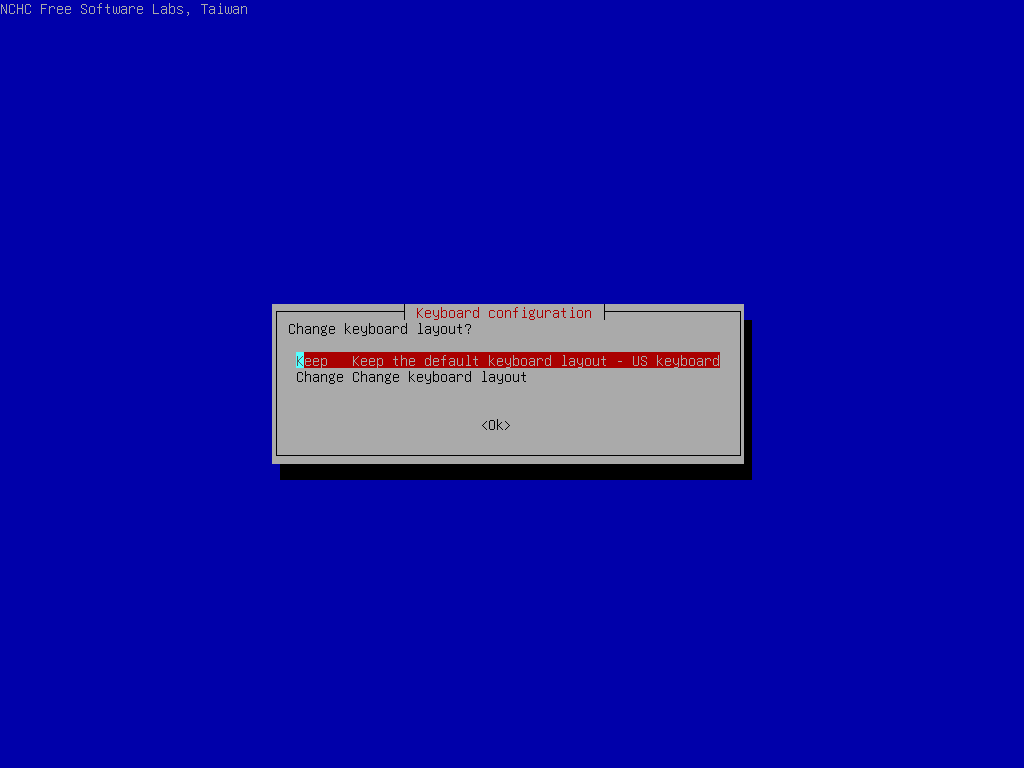
The default keyboard layout is US keyboard, therefore if you are using US keyboard, just press enter (i.e. use the option Keep).
If you want to change keymap, you can choose Change then follow the dialog to change it.
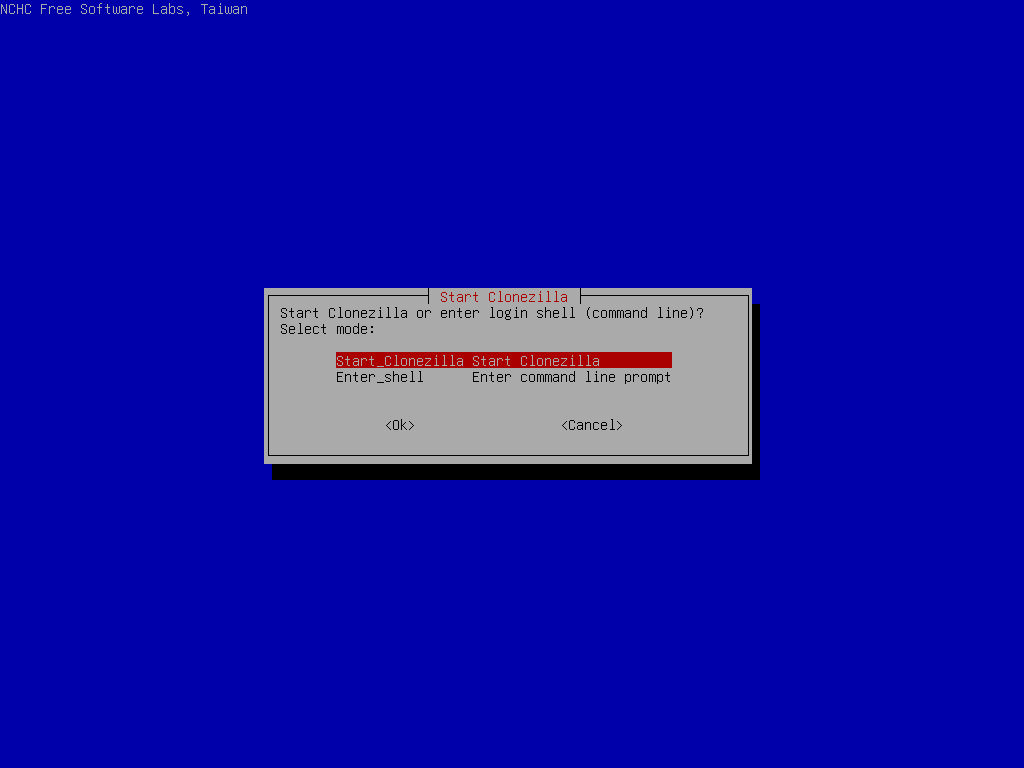
Choose Start Clonezilla
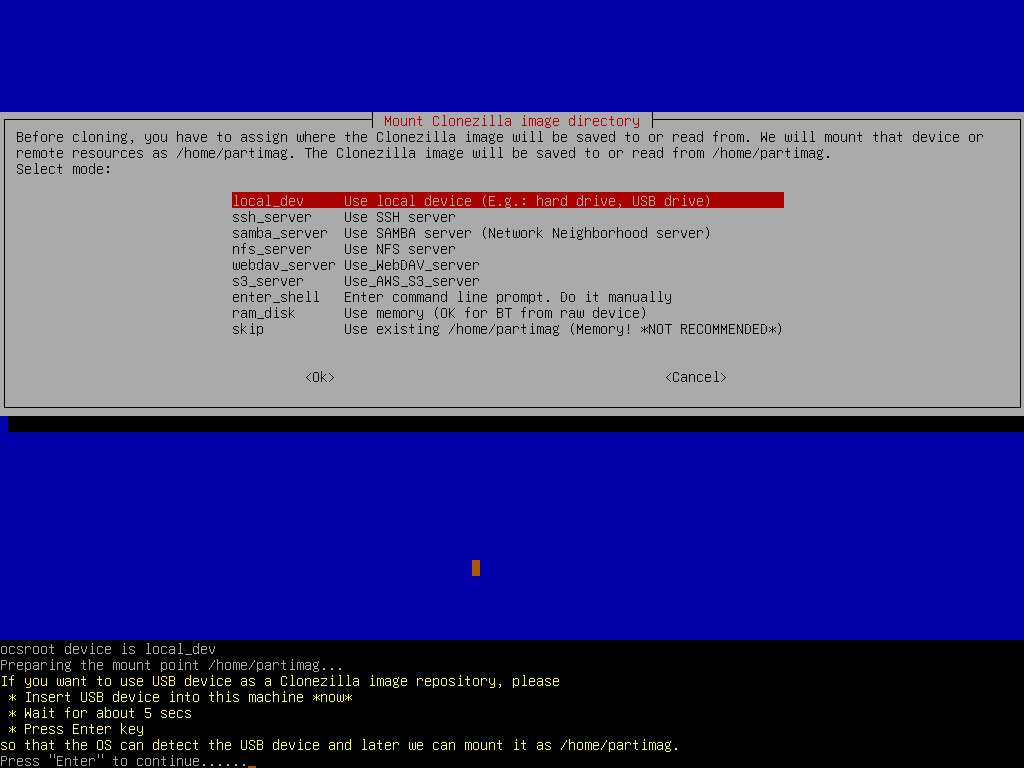
Choose device-image option
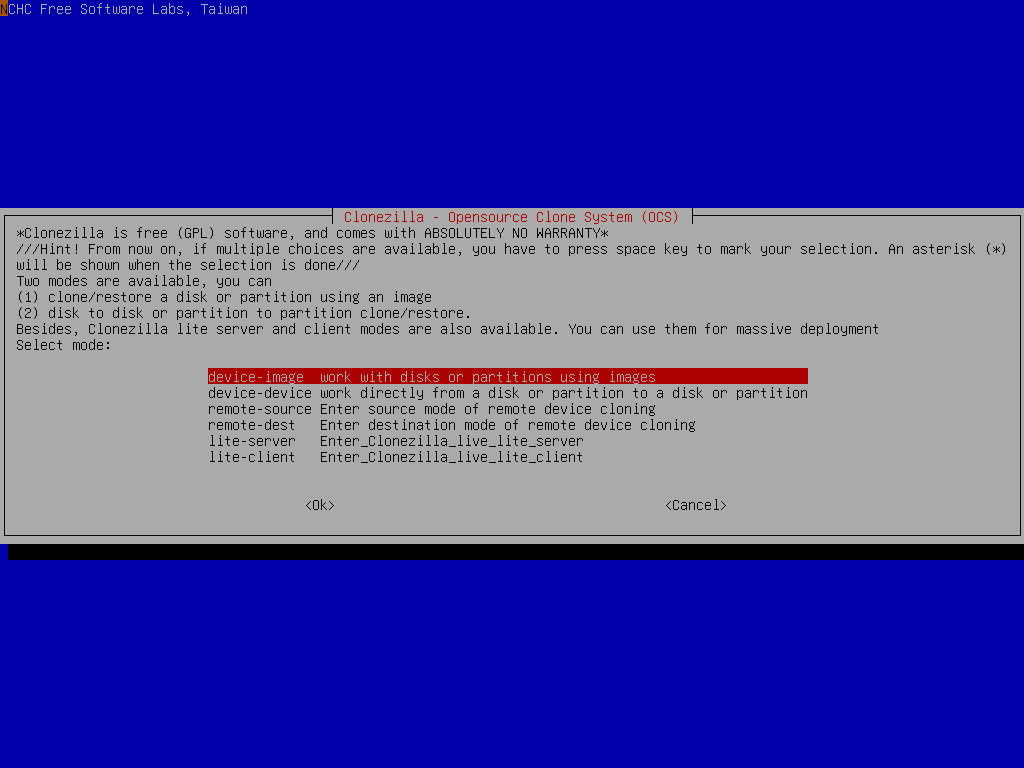
Pay attention to the hints, too. You might need that:
Hint
From now on, if multiple choices are available, you have to press space key to mark your selection. A star sign (*) will be shown when the selection is done.
Choose local_dev option to assign sdb1 as the image home
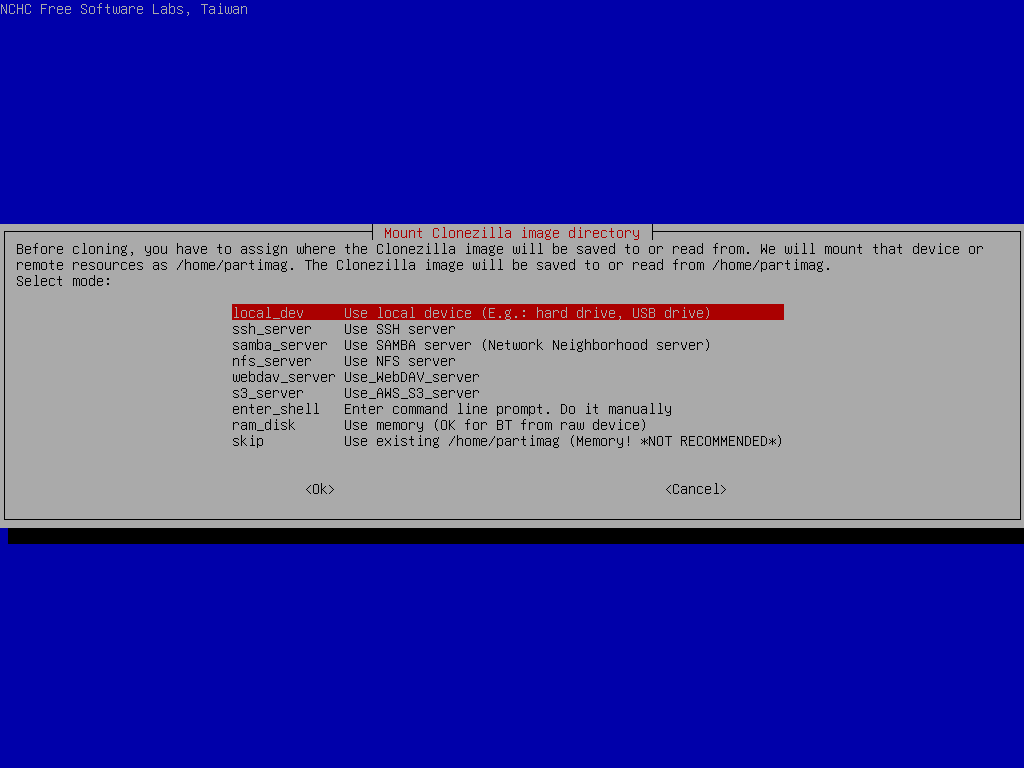
There are other options, e.g. sshfs, samba, nfs or webdav, AWS S3 or Openstack Swift, you can use when network is available. This is very useful when 2nd local disk is not available.
Since we choose local_dev option, we can use 2nd disk or USB flash drive to save 1st disk's image. If using USB flash drive as repository, insert USB flash drive and wait a few secs.
Clonezilla will scan the disks on the machine in every few secs, and show you the results:
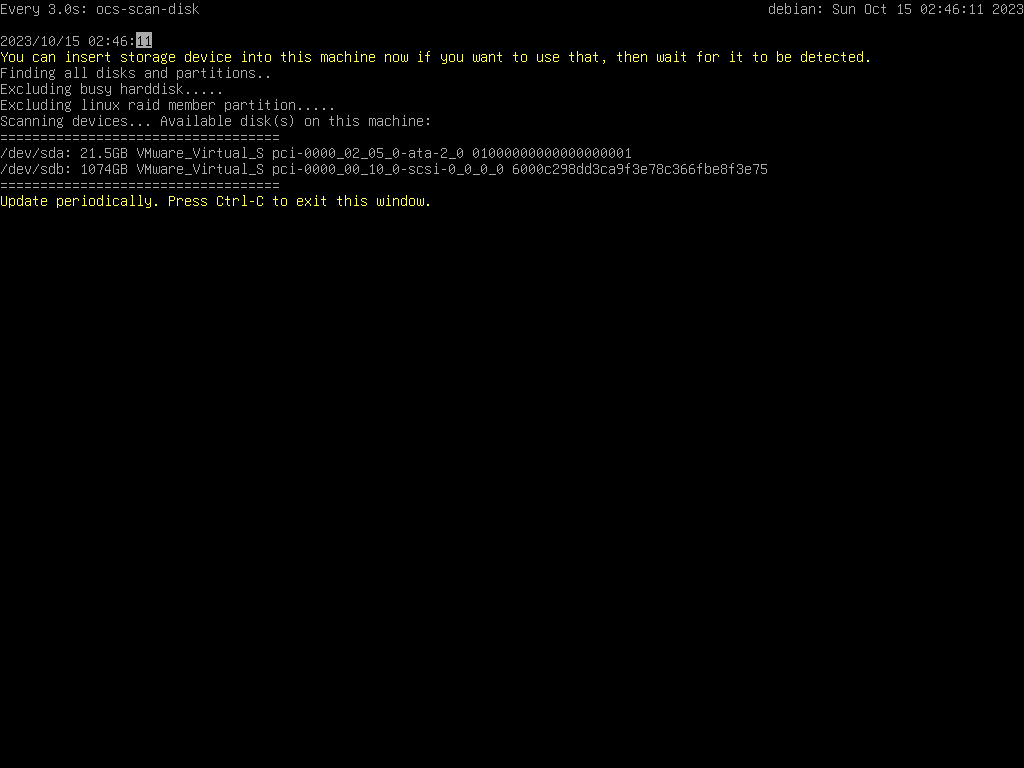
Once you see the device you have inserted shown on the status, you have to press Ctrl-C to quit the scanning report.
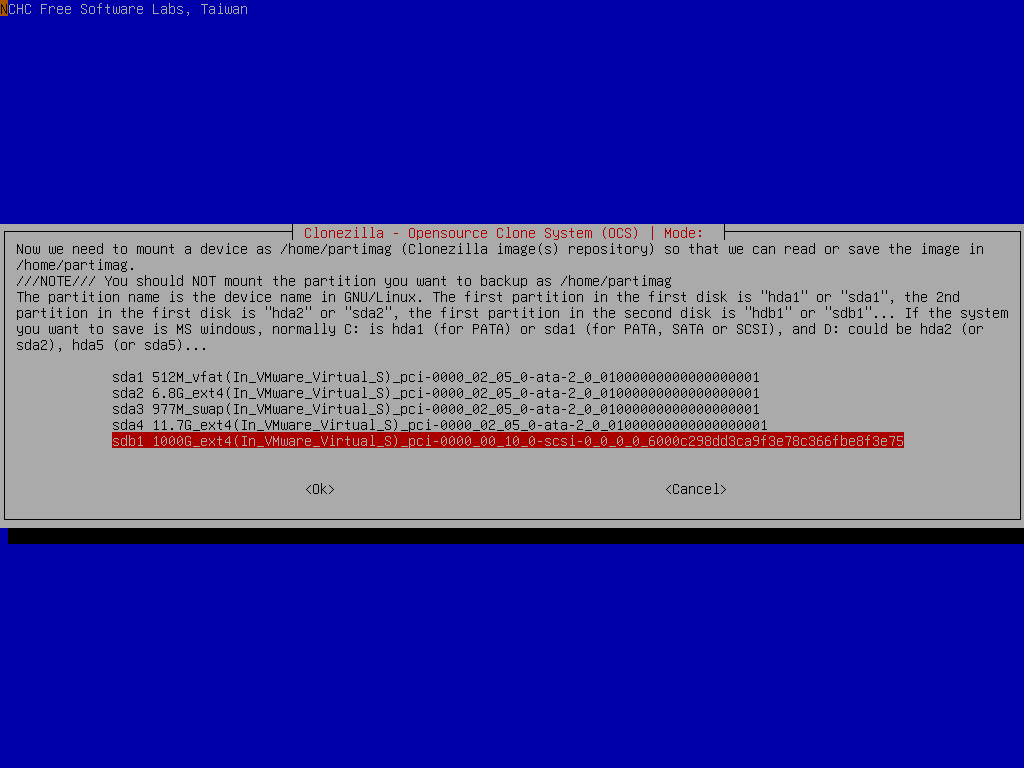
Select sdb1 as image repository, then choose restoredisk option
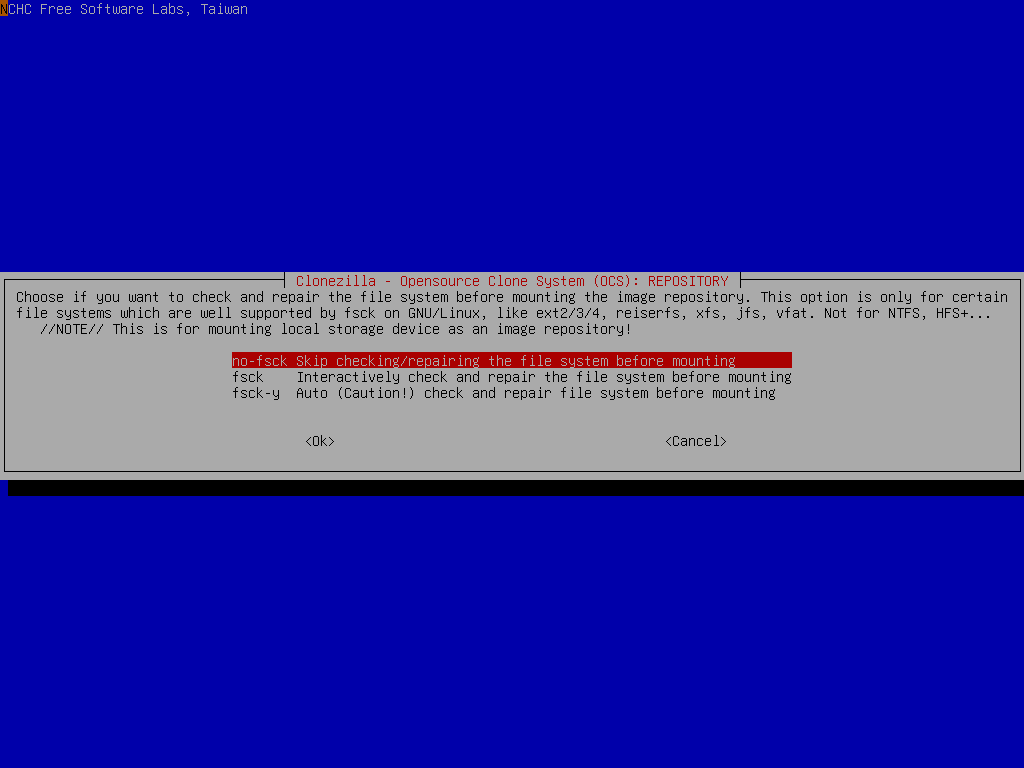
Before mounting the device sdb1, it allows you to do a file system check. Here we skip it.
Choose the directory name on /dev/sdb1 as the image repository. Here we put image on the top directory (i.e., Current selected dir name is /):
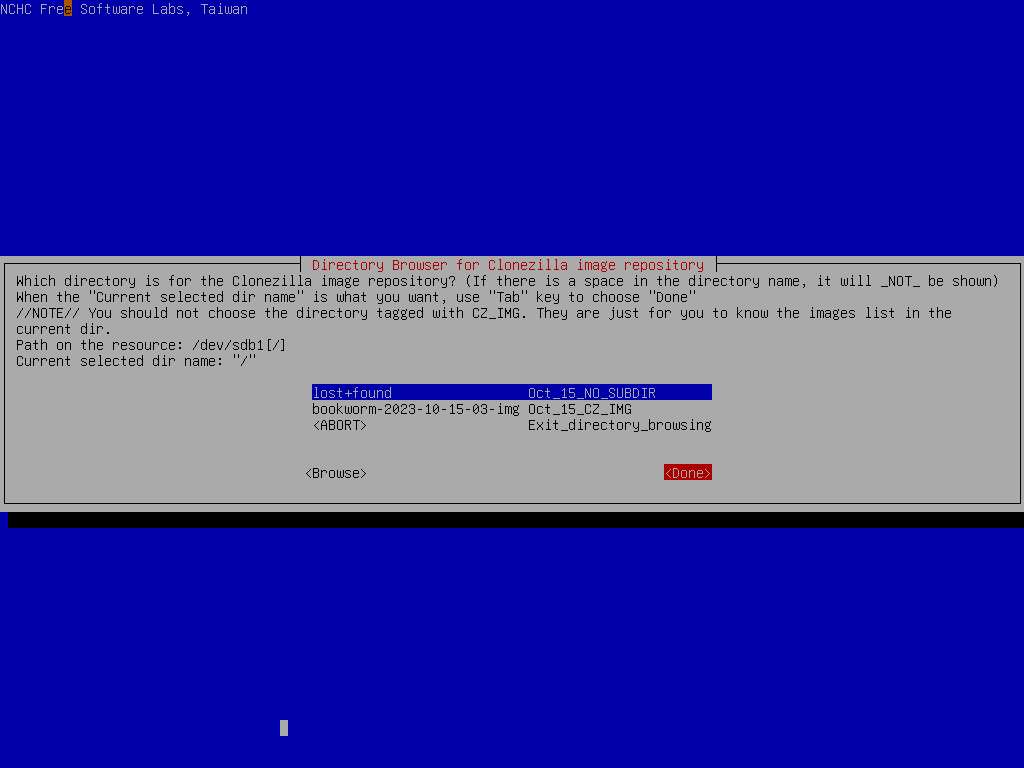
If you are not familiar with the disk or partition name in GNU/Linux, read the hints:
Hint
The partition name is the device name in GNU/Linux. The first partition in the first disk is sda1, the 2nd partition in the first disk is sda2, the first partition in the second disk is sdb1... If the system you want to save is MS Windows, normally C: is sda1, and D: could be sda2, or sda5...
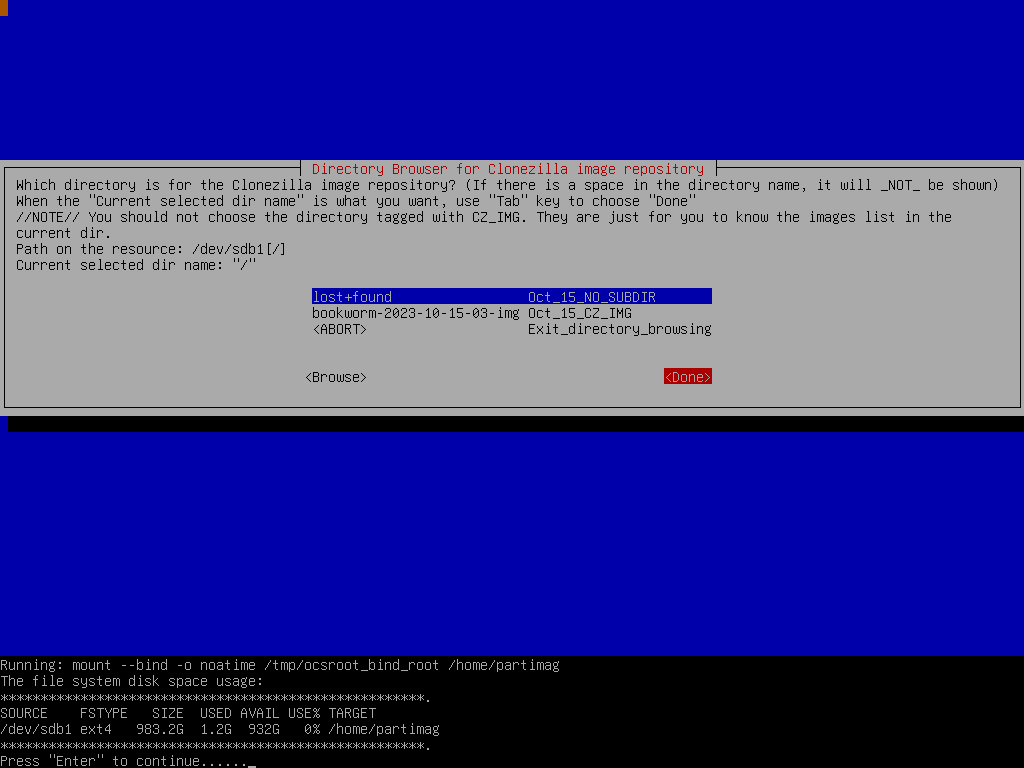
Then Clonezilla shows you the disk usage report:
Here we choose Beginner mode:
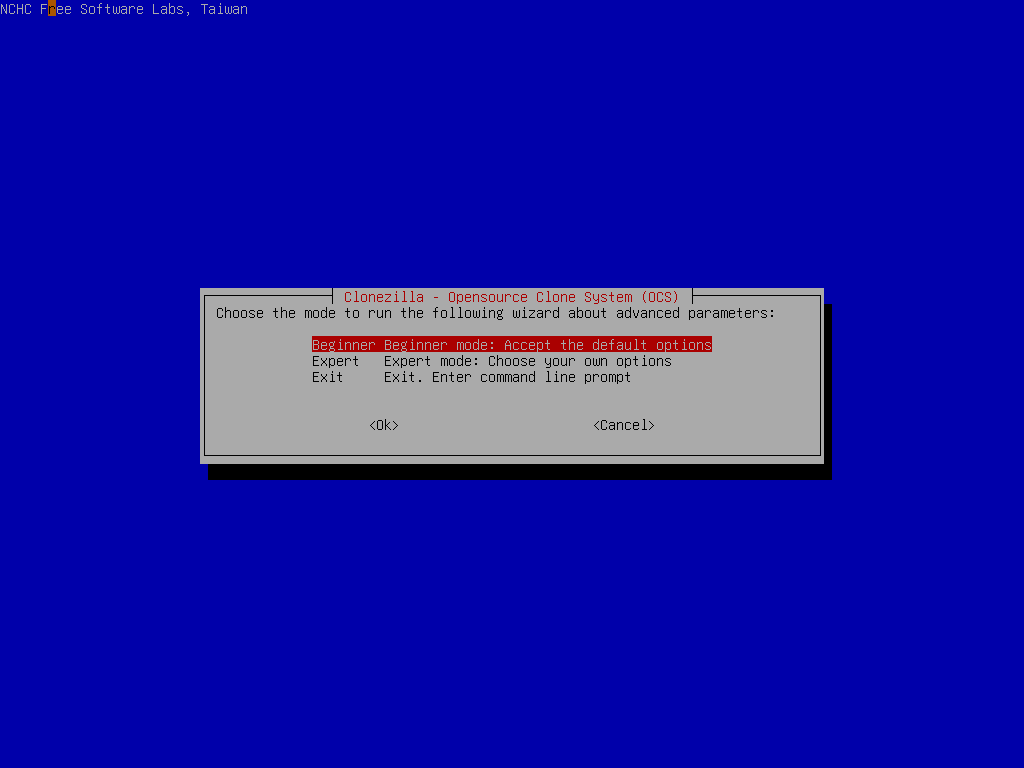
If you choose Expert mode, you will have some chances to choose advanced parameters, e.g. imaging program, compression program, etc.. You can see more details here.
The advanced parameters for creating recovery Clonezilla live
Click to view the content
Select advanced parameters
Choose the extra parametrs you want. Here we just press enter to accept the default settings:
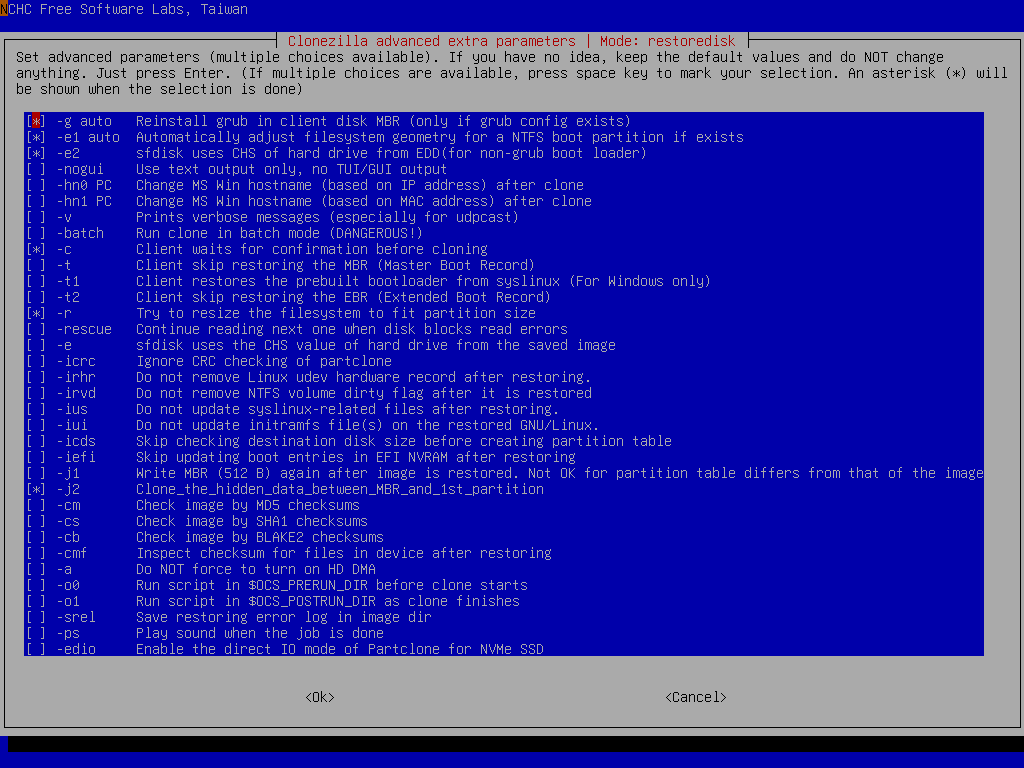
Choose the option -k0 (Use the partition table from image) or if the destination disk size is larger than the size of source disk of image, you can try to use option -k1 which will create the partition table proportionally in the destination disk and turn on option -r to resize the file system in the partition automatically. This is useful to make use all of the destination disk size.
ISSUE: FAQ/Q&A link missing
For more details about the advanced parameters of Clonezilla live, please check this FAQ/Q&A.
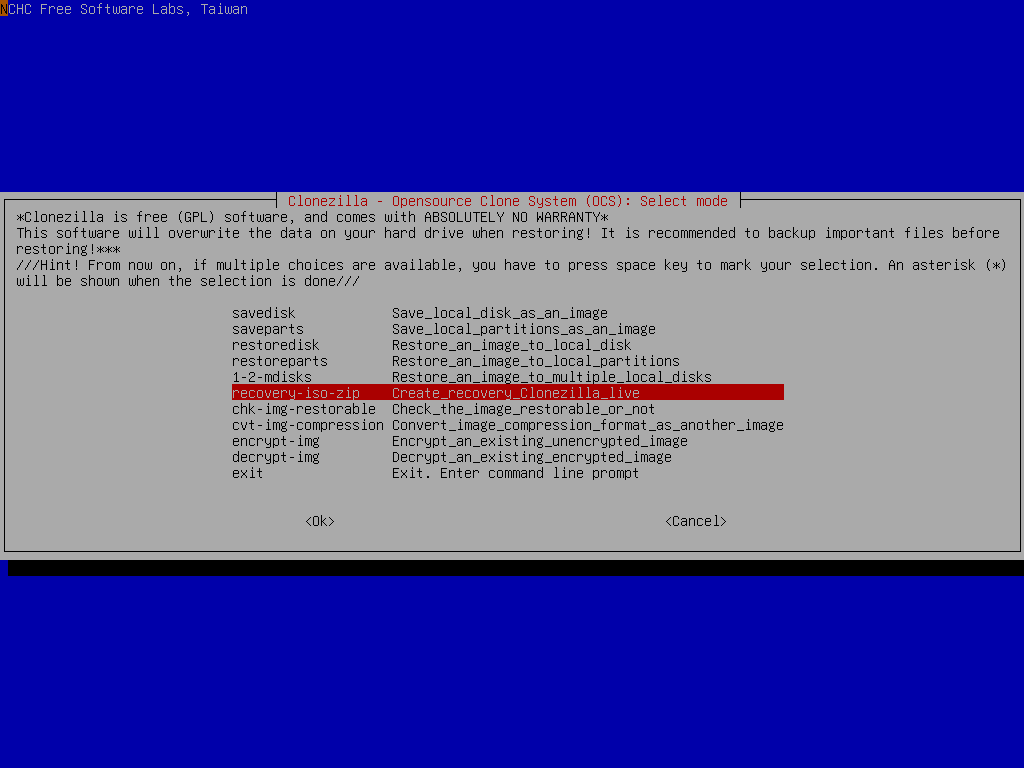
Now you can select recovery-iso-zip option:
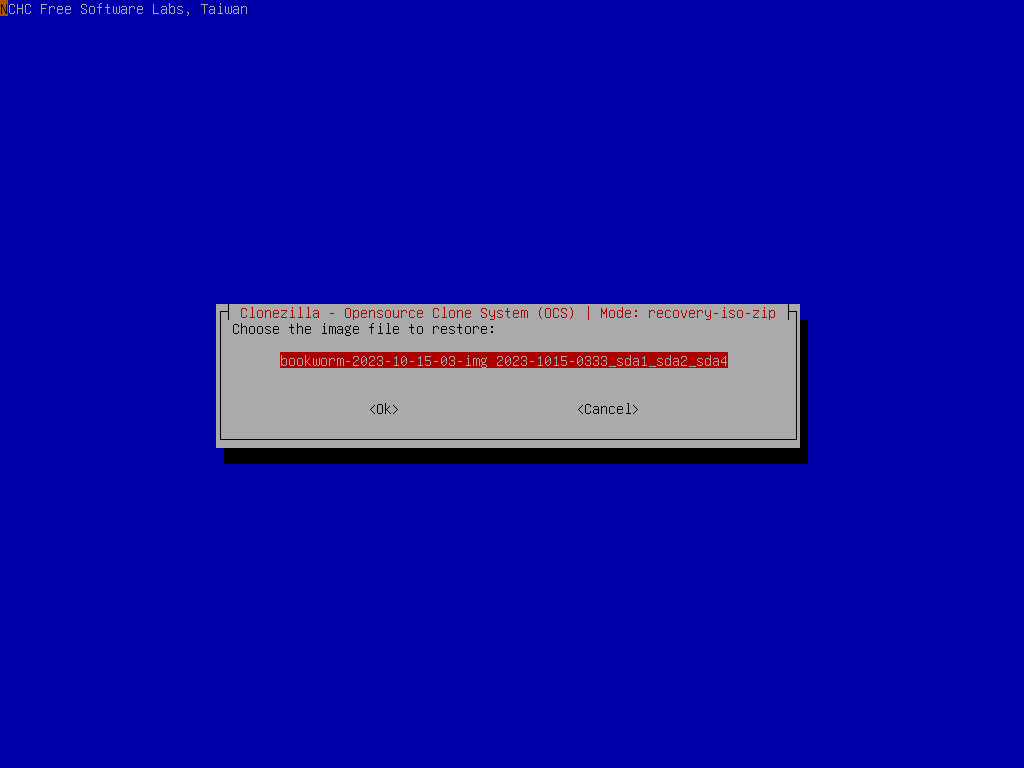
Choose the image you want to include in the recovery CD or USB flash drive:
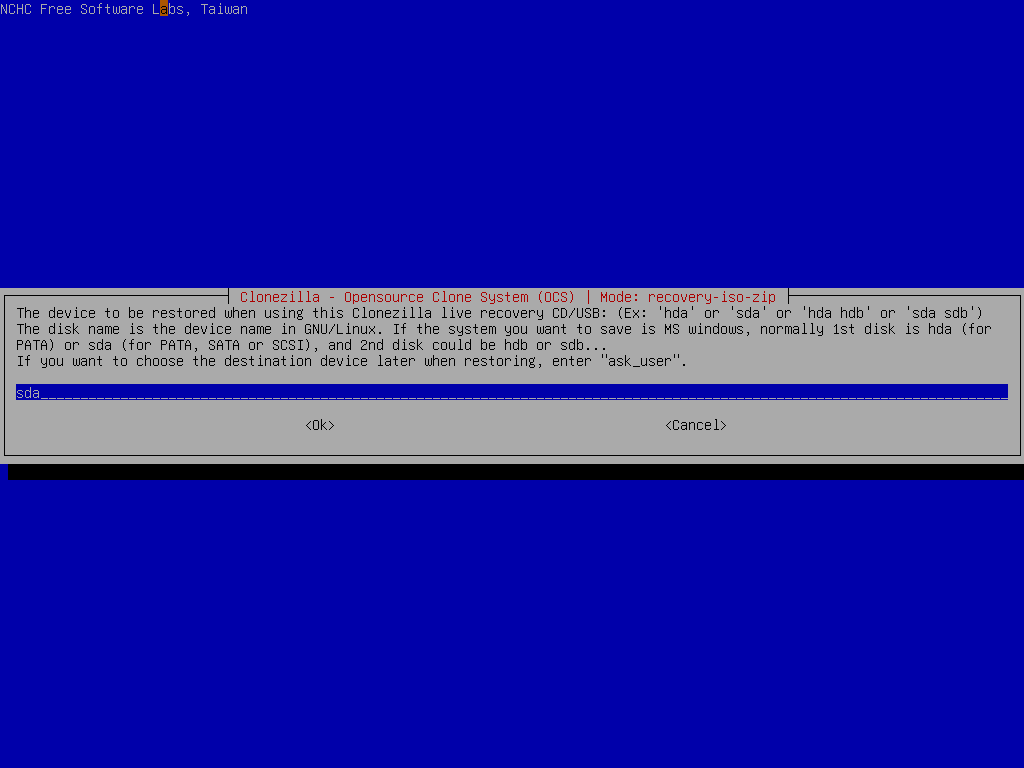
Choose the destination disk to be recovered when the recovery CD or USB flash drive is used:
Note
If you want to ask the destination disk after this recovery CD is booted, you can use the keyword ask_user and your user will be able to choose the destination disk after he/she boots the recovery CD.
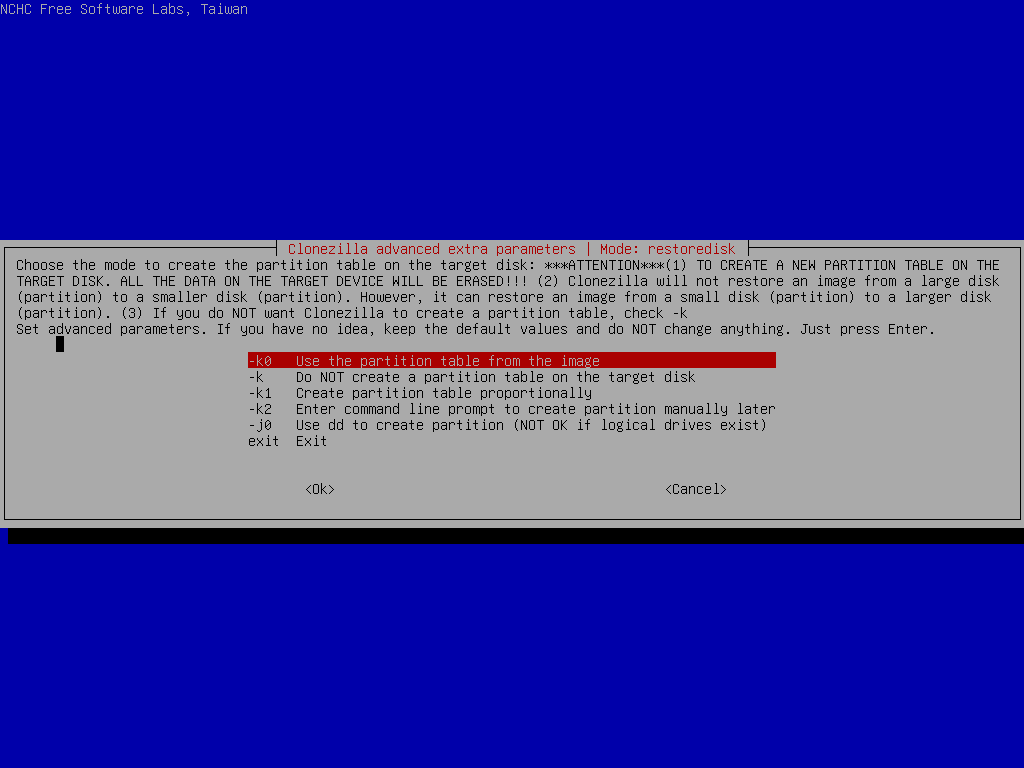
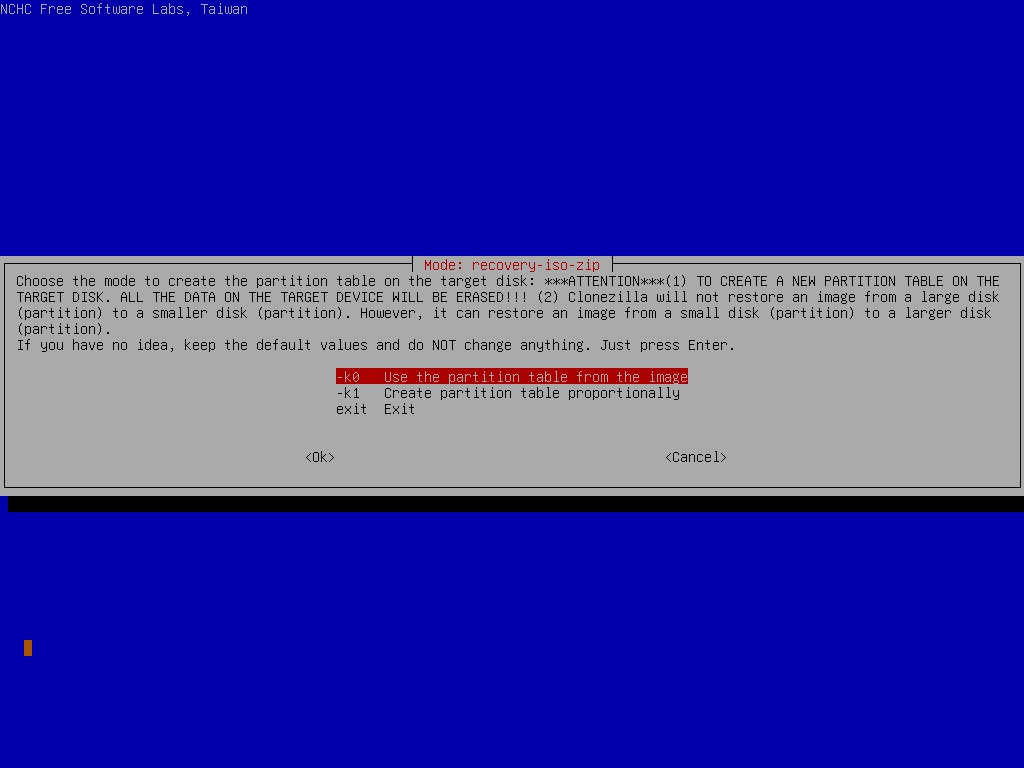
Choose the option to create the partition table on the destination. First choice is to use the partition table from image, 2nd choice is to create the partition table proportionally, i.e., if you have the image which is saved from a smaller disk, here you can create the partitions proportionally on the destination disk:
Choose to check the image integrity before really restoring the image to disk sda:
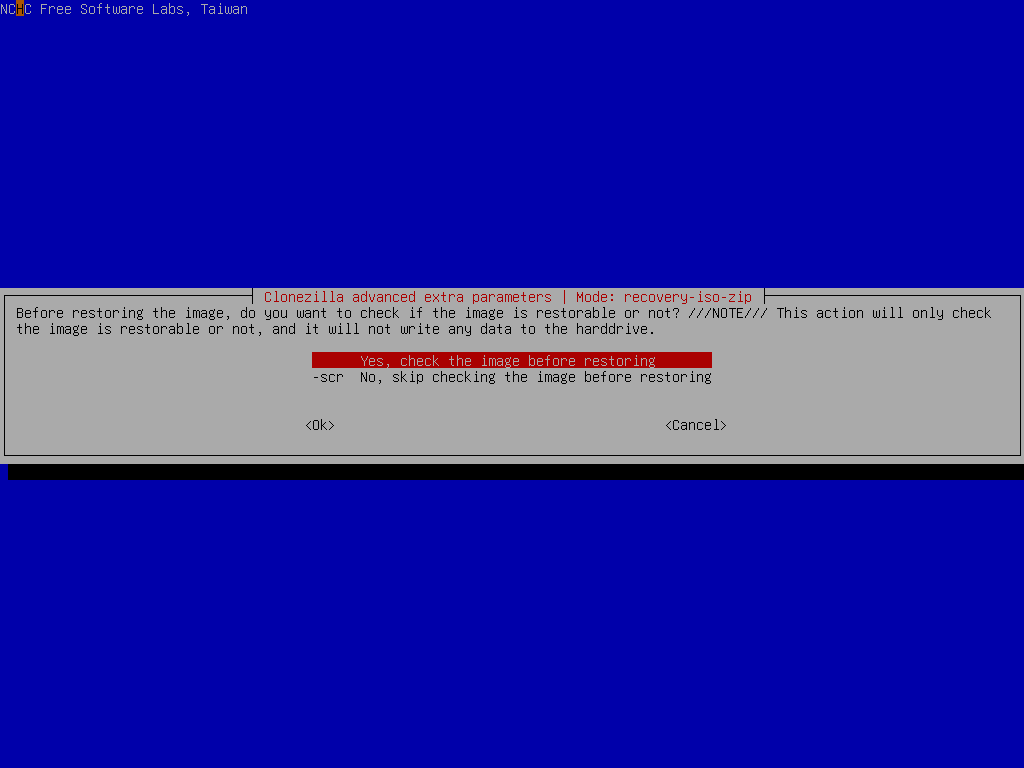
It's recommended to check the image before restoring it. You will not know if the image is broken or not. If you are really sure about the integrity is OK, then of course you can choose -scr to skip checking.
Select the mode you want after the disk restoring is done:
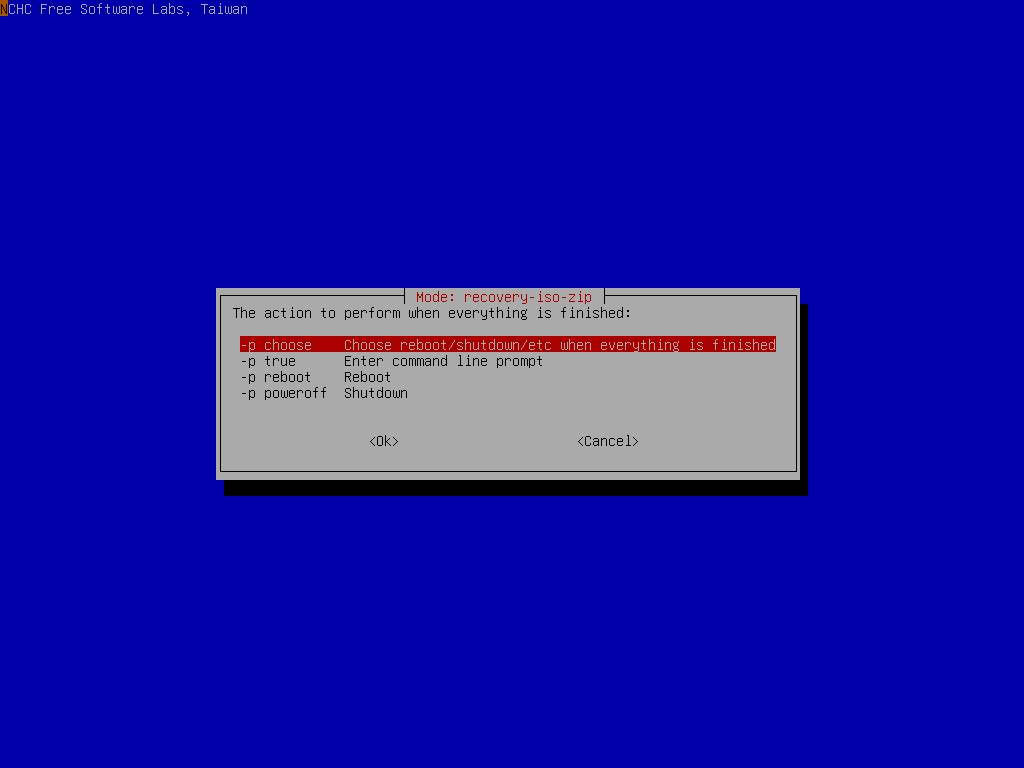
By default we will choose later, but if you have decided, you can choose to reboot or poweroff the machine.
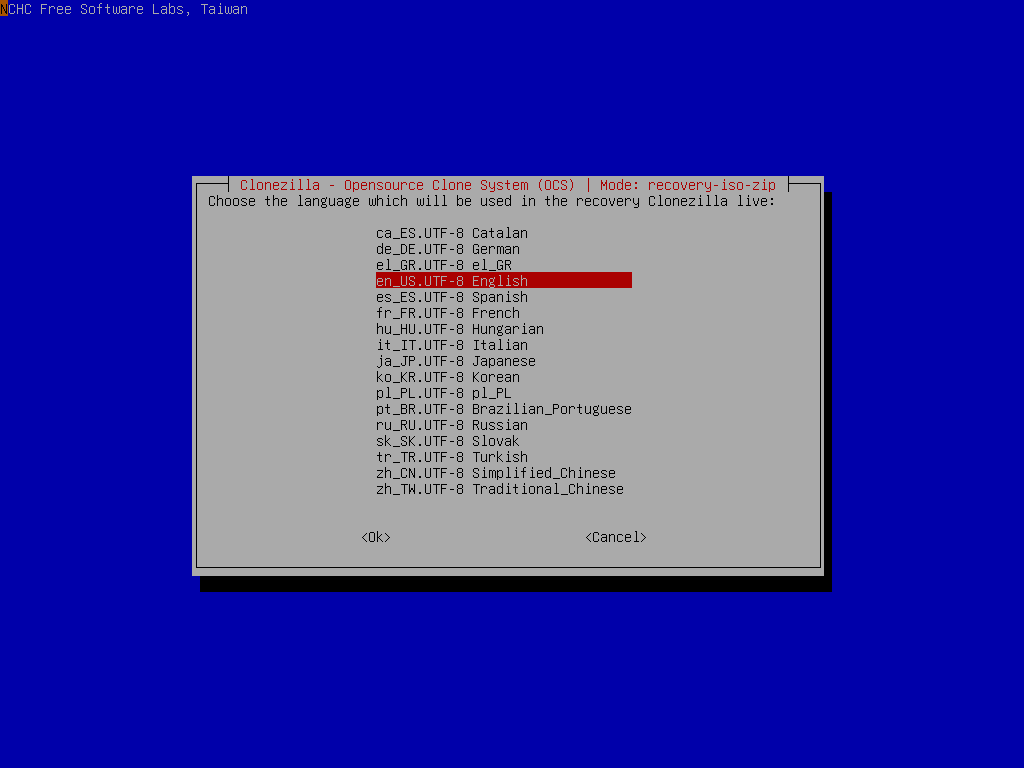
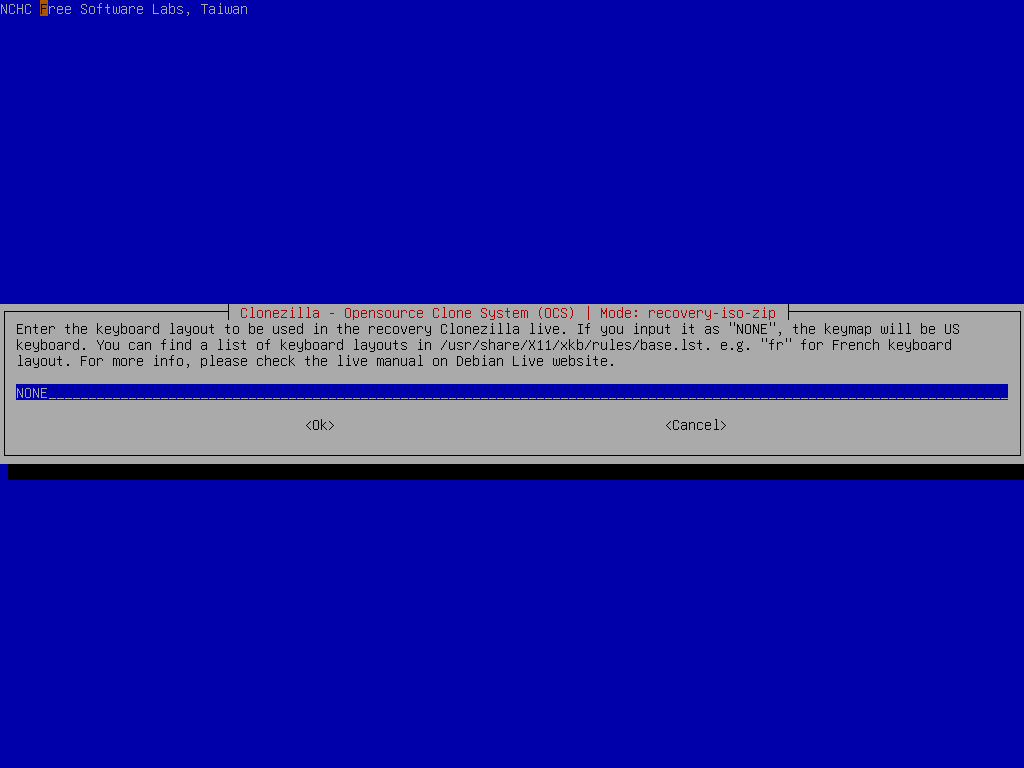
Choose the language when the recovery CD or USB flash drive is used:
Set the keyboard layout when the recovery CD or USB flash drive is used, here we chose NONE. That means we won't change the keyboard layout, i.e. the US keyboard layout will be used:
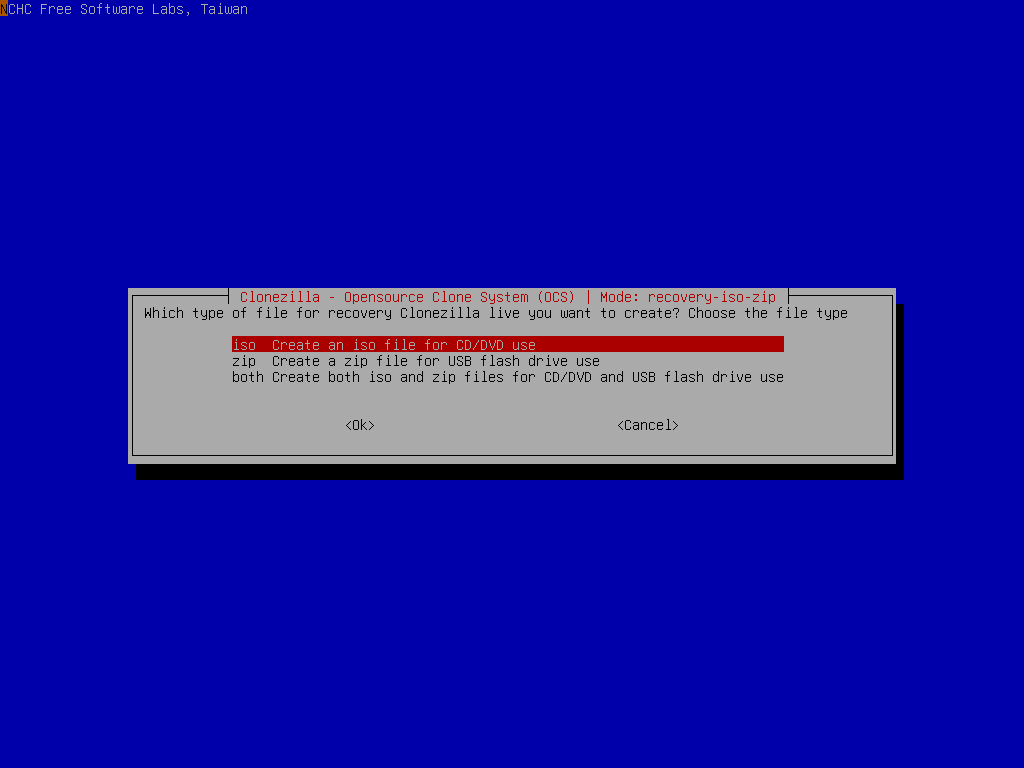
Choose you want to create iso file (for CD/DVD), zip file (for USB flash drive) or both. Here we choose iso:
Clonezilla will list the command to create such an iso file:
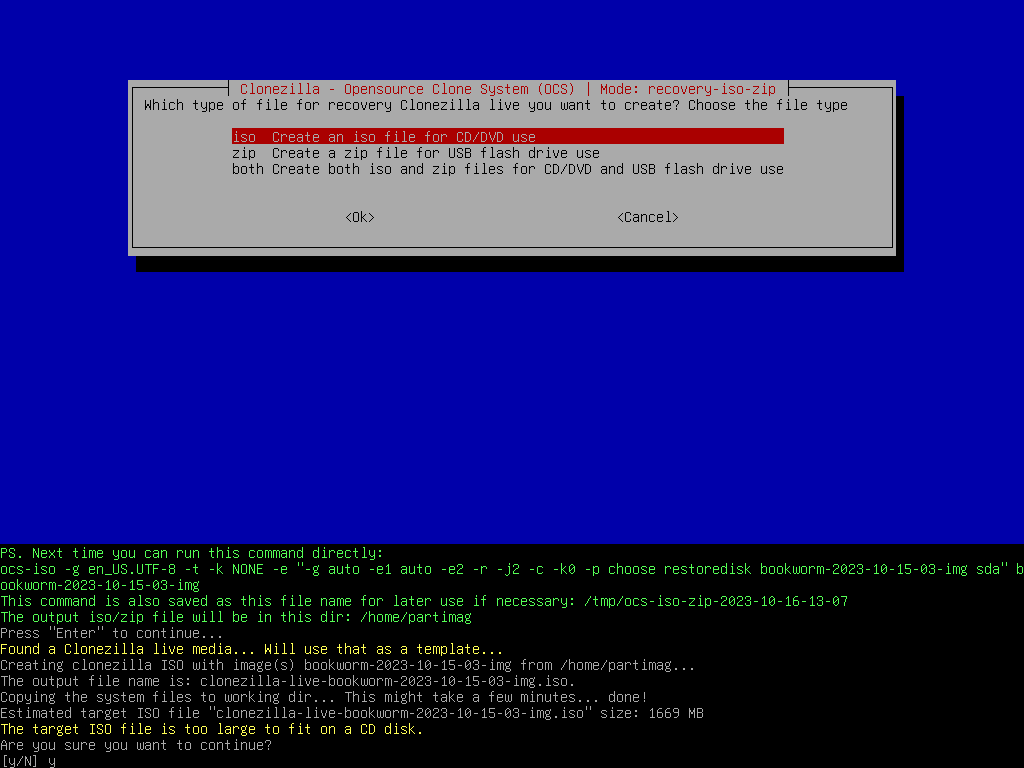
It now asks if you really want to create such an iso file:
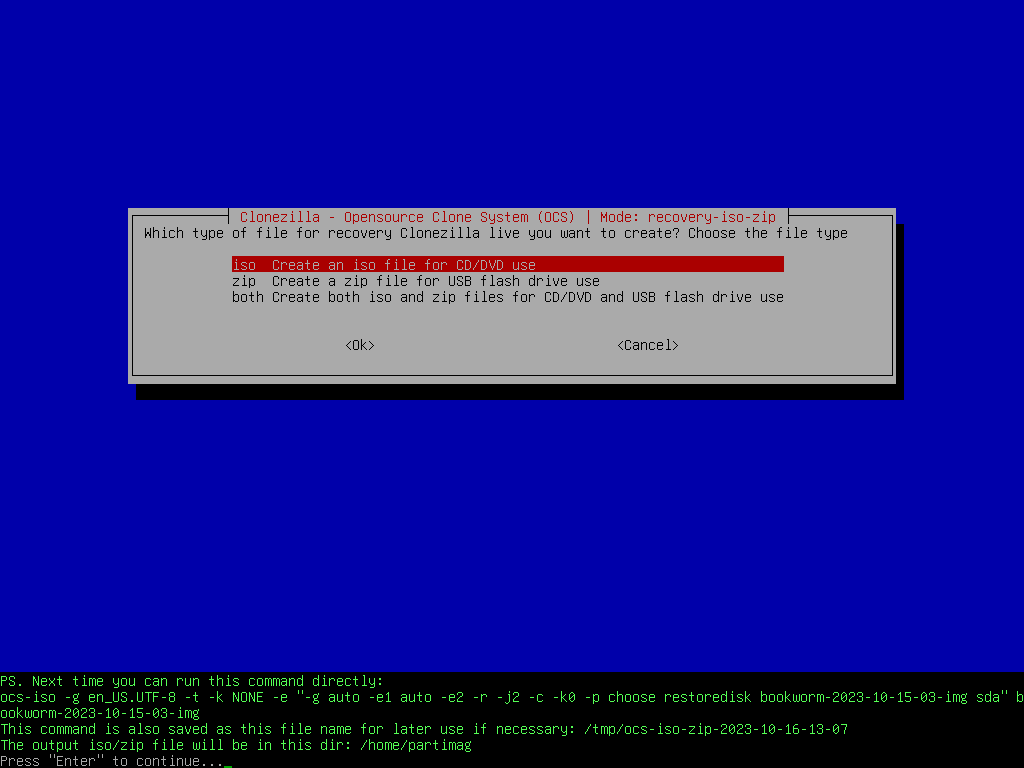
The iso file for recovery CD is now starting to be created:
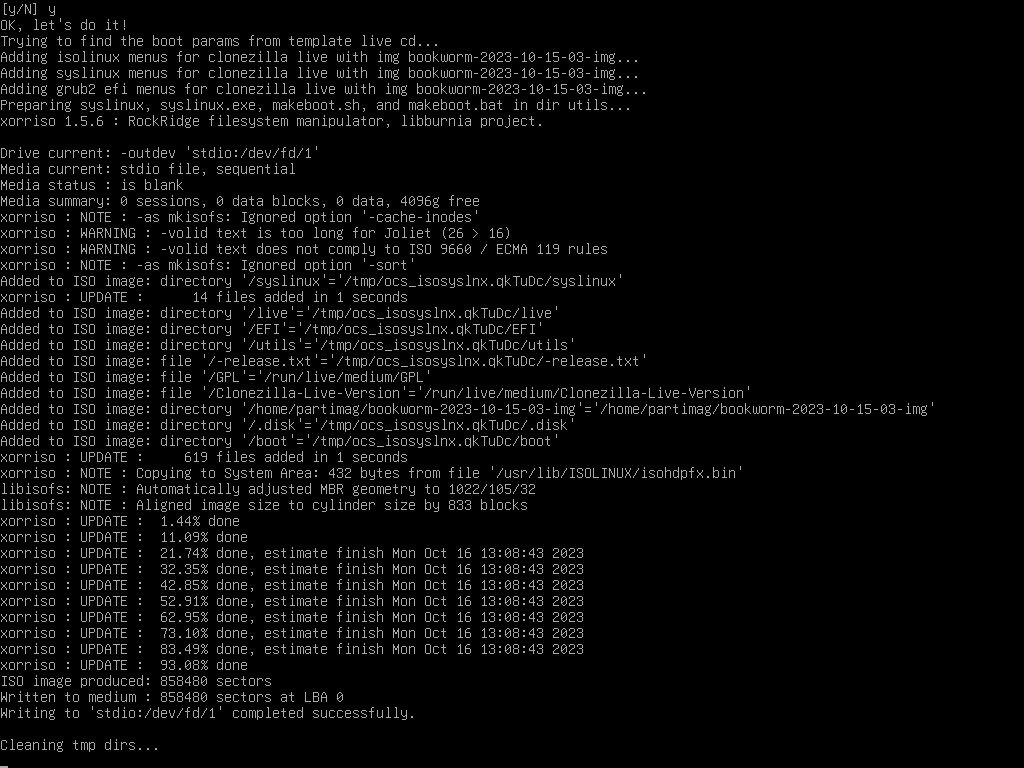
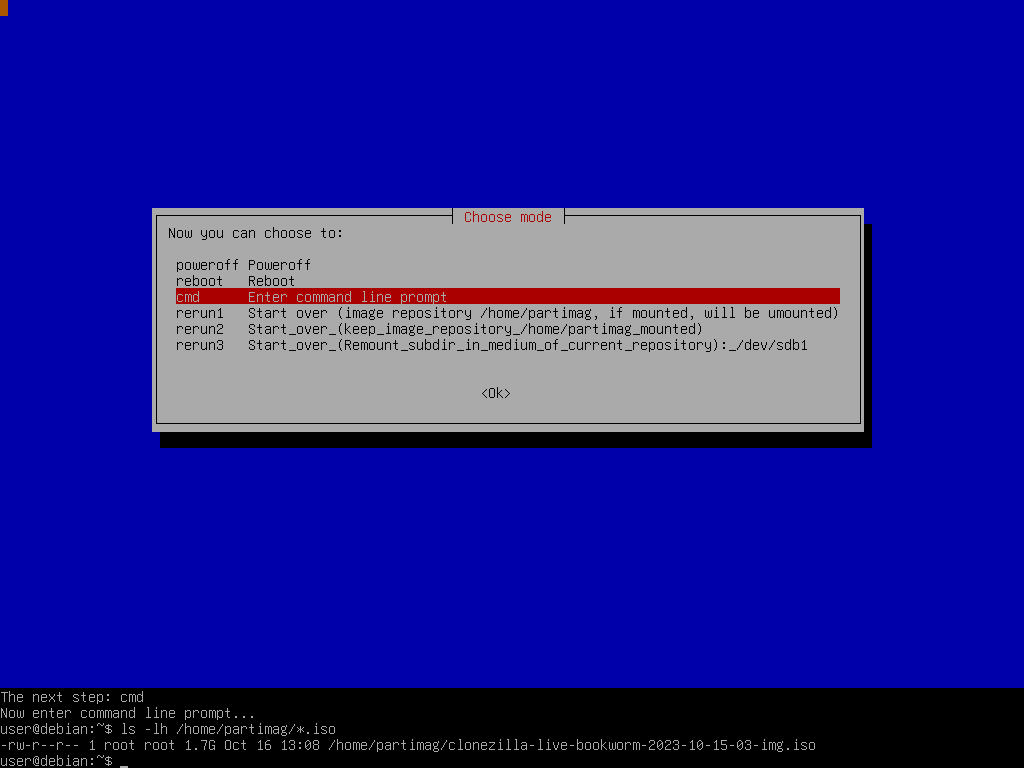
Once it's done, the created iso file is in the dir /home/partimag:
ISSUE: Update to Clonezilla LiveUSB link
That's all. You can copy (or use network tool to copy, e.g. scp, lftp, to copy the file to another machine. If you need to config the network, run: sudo -i; ocs-live-netcfg to config the network.) then create iso file to the machine running with a CD burner. Then you can use burning tool to burn the iso image to CD or DVD. If you want to create a recovery USB flash drive, choose to create zip file, then follow the same method as creating USB flash drive version of Clonezilla live to put the created zip file on USB flash drive and make it bootable.